
Table of Contents
Bias, or offset, frames are the simplest calibration frames utilized in astrophotography because there are no demanding criteria or setup concerns, and they can be saved and used for months. Bias frames are actually fairly important, both for your light frames and for your flat frames. In fact, proper use of bias frames is required in order for flats to calibrate your light frames properly and to remove unwanted artifacts from the lights themselves .
Background
Like all calibration frames, bias frames attempt to “calibrate out” a certain unevenness or discrepancy in the image stack that isn’t actually present in the field of view, usually as a result of our equipment. In the case of bias frames, we’re trying to remove a very faint sensor-read signal that appears in the camera electronics when the data from the chip is “read” and converted to digital values before the image is produced. Bias frames encapsulate the value of “offset” that your camera firmware is applying to the image, which serves to prevent clipping of the histogram at the very left side due to random statistical fluctuations. This particular tutorial concerns taking bias frames for DSLRs, but there are very similar principles used for other camera types.
No matter how short the exposure, there is a certain amount of undesirable “signal” that ends up in the image as a result of the camera reading information from the sensor. This pattern contribution comes from the camera’s electronics which excite the sensor’s cells as current flows near them, leading to systematic additions to images that are not reflective of what was really “seen” by the camera. We attempt to remove this by isolating the effect on a “blank” image (a bias frame) and then subtract that image from all of our light frames before processing. We should also do so for the flats, because they will also have a bias signal within, as well as the potential for an added offset value which must be subtracted to normalize the flats multiplicatively again (see the importance of this later on).
How to Create a Bias Frame
You will need bias frames for every ISO that was used in your lights and flats (yes, flats are often imaged at the same ISO as the lights, however not by me for various reasons). Bias frames can be kept for a long time, generally speaking, so produce them carefully and correctly the first time so you don’t have to revisit it again. Of course, you also need a set of them for each ISO for each imaging camera as well (I used 2 different DSLRs at one point).
You will take a handful of bias frames in the creation of the master bias frame (more on that next). Here are the rules for taking the individual bias frames:
- Set your ISO to the same value at which your light frames (and/or flats) were taken (this is critical and non-optional under just about all circumstances).
- Set your exposure to the fastest value it can possibly be (this is usually something like 1/4000s or 1/2000s for DSLRs).
- Don’t bother attaching a lens and don’t do this on the telescope; take the camera off and do it with the camera body alone and the lens hole covered with the dust cap.
- Take the frames in a perfectly dark room to prevent any light from reaching the sensor; the purpose of this is to isolate the camera read pattern without any external light getting in.
You should take a predetermined amount of them (100 is good- more on this next) for each ISO value for each camera you used. I currently only image at ISO 200 on my Nikon 5300, so you don’t have to cover all ISOs your camera can do, just any you’re imaging with. You could also just do it after the fact and not take any ahead of time so you know which ISOs that will be.
There’s really no need to change ISOs during the night (nor really at all across different nights) unless you’re doing HDR work. Here is a detailed rundown of choosing ISO values for a DSLR in this context.
An individual bias frame should look mostly black (the highest ISO values might show some faint features). Here is a bias frame on the highest ISO for my D5300:

At lower ISOs, you’re unlikely to see anything if the camera has low enough read signal. Note that this image is “debayered” already by the camera because it’s just the jpeg that came out of the camera. You should be using RAW, but this is just to show what to expect right out of the camera.
When stretched harder, it may look something like this before it is debayered:

I show the non-debayered version because that’s what will be used to calibrate the appropriate lights and flats when you’re preprocessing in your program of choice. Notice the brighter banded features throughout the frame as well as the strongest feature on the bottom 5% of the image, which vanishes upon moving upwards; this comes from the reading of the sensor through the camera electronics which are physically located at this location!
Creating a Master Bias
Once you have the ISO determined from your imaging session, snap 100 bias frames with that same ISO in the manner described above. These will be stacked to produce a master bias frame, which is a single frame that is obtained by stacking/combining the individual bias frames of the same ISO value. Other ISO values and cameras will have their own 100 images and respective master frame, each. For example, you’ll have 100 bias frames (and one resulting master frame) for ISO 200 on one specific Nikon D5300. You’ll have another 100 frames and master for ISO 400 (if you need it), etc. You’ll also have separate frames for any other camera, even if it’s another Nikon D5300 (the chips are not going to all have the same bias profile).
Typically one uses between 25 and 200 bias frames to produce the master. Given that you want to reduce noise as much as possible, and they don’t have to be redone for a long time (if ever for that camera), 100 is highly recommended. If you only do a few dozen, you’ll be adding noise (well, subtracting it, but same thing!) to every image going forward; you might as well do it thoroughly now, because even if the addition of the noise is small (say, 5%) compared to other noise types, why not prevent this one time for months? The returns do diminish quickly after this, however.
Once you have your many bias frames, use your program of choice to create the master bias frame, which is essentially a stack (combination) of all of the others. This usually entails averaging all of your individual bias frames with only the most basic pixel rejection active. Do not use any weighting algorithms (they should all contribute equally to the final stack) and only use basic high and low pixel rejection. No need to use normalization either.
Keep reading for a more detailed explanation of the process in Pixinsight.
Creating a Master Bias in Pixinsight
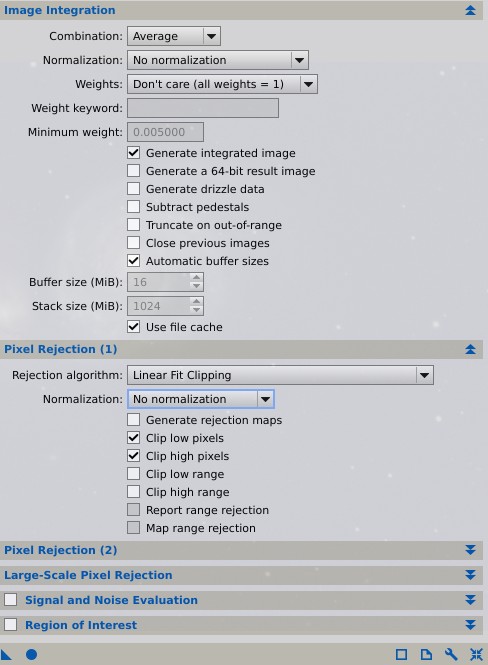
Here are the settings that are most applicable in Pixinsight, specifically for the ImageIntegration tool, to create a master bias frame:
Here is what my master bias looks like for high ISO on the D5300:

Creating a Super Bias in Pixinsight
Notice how the master bias above is much less noisy than the individual bias frame above. That was the point of stacking the individual bias frames: to reduce the prominence of the noise and bring out the true bias signal. This is also why using more bias frames is more helpful.
Now, most of the features present in bias frames are based on row-like and column-like patterns present in the sensor. As a result, Pixinsight’s SuperBias algorithm takes advantage of this fact by taking your master bias frame and removing the non-row and/or non-column structure, while preserving the column or row features (you choose which, based on your individual master bias frame’s features). This should, in theory, leave you a “super” master bias frame that contains no noise but still has the bias signal; this mimics stacking an infinite amount of bias frames to leave no noise.
The default settings work well here:
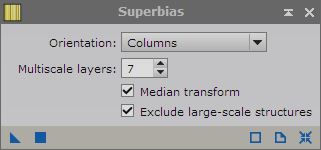
Change the dropdown to “rows” if your features are more row-oriented, or “columns and rows” if both are present. I’ve found more DSLRs to have column-like features. Consider tweaking the other three parameters to improve the results further. A larger number of multiscale layers picks out larger features and vice versa.
Here is the super bias I have made, stretched to show detail, but not debayered.

Compare this to the raw master bias and you’ll notice it still contains the main features, minus the noise! This is a great algorithm that removes the need to take hundreds of bias frames. I still use 100 for each ISO.
Bias Frames Last Awhile!
I have kept my bias frames for over a year, sometimes two. The truth is, the bias signal is chip- and camera-dependent, but rarely changes in time unless some modification is made to the camera, for example. It is not really dependent on temperature or the telescope used, either.
I suppose bias frames could be used indefinitely, so I have a folder on my computer with master and super biases for each ISO, although nowadays I exclusively image at ISO 200. You may need others to calibrate your flats (if they weren’t taken at the same ISO that you already took care of), which I’ll discuss more now.
Bias Subtracting your Flats
As you probably know, flat frames are used to correct for uneven illumination of the field of view by dividing into (as opposed to subtracting from) the light frames. The amount that the image should be divided into depends on how bright the flats are at a certain location. However, even bright, well-illuminated flat frames require bias subtraction because these subtle differences manifest in your lights after you have divided them by the flats, especially after stacking. There is also a sort of “calibration” of the flat frames that occurs when they are bias-subtracted that greatly helps their ability to correct your lights; if your camera applies an offset value (600 ADU for the D5300), then failing to subtract this value, present in the bias frames too, will cause the multiplicative operation of flat calibration to behave improperly on your light frames. It is like converting from Fahrenheit to Celsius: first subtract 32, then divide by 9/5.
You can get undercorrection or overcorrection with your flat frames if you don’t subtract the bias signal from those flats before creating a master flat. If the flats over-correct your lights, you’ll be left with a reverse vignette (darker in the center and brighter towards the edges) and if they under-correct, vignetting will not be fully removed, nor will other gradients.
Just as with the light frames, you must calibrate your individual flat frames with bias frames taken at the same ISO as the flats before creating a master flat frame. For more on flats, check out this.
Process for Bias Calibration
Here is a summary of the process for bias frames when not using dark frames:
- Gather your lights and flats as you normally would.
- Take 100 bias frames (if you don’t have them from another time) using the same camera and ISO as your lights. If you used multiple ISOs during imaging (try to avoid doing this), you need a set of 100 for each ISO used.
- Take 100 bias frames using the same camera and ISO as your flats (if the ISO is different than in step 2, otherwise you already have them!)
- Stack each set of bias frames separately, using the parameters and rules outlined before, to produce a master bias for each ISO you need.
- Optionally, create a super bias from each master bias you have. These would now be your new master bias frames.
- During preprocessing, subtract the master bias (or super bias) from every single light frame before continuing.
- During preprocessing, subtract the master bias (or super bias) from every single flat frame before stacking them to produce a master flat frame. This is important.
- Keep your bias data, especially the masters, around for future times in which you use that ISO with that camera. Definitely don’t take bias frames every time!
What if I Use Dark Frames?
You expose dark frames for the same amount of time as the frames they’re calibrating, but also with the aperture covered (like with bias frames). Therefore, when you subtract (uncalibrated) dark frames from something, both the read signal and the offset value get subtracted too, which fulfills the purpose of bias frames in itself! Therefore, when using dark frames for a certain part of the process, you don’t need to use bias frames there. Theoretically you could bias subtract your dark frames, then stack, then subtract both the master dark and the master/super bias from the data in question, however this is not only redundant concerning the bias process, but also noisier; dark frames will do the job of bias frames and have less noise than bias frames, so the latter shouldn’t be used.
Then you simply have to decide if you’ll be using dark frames for your flat frames (often called “flat darks”) instead of bias frames. Usually thermal signal is negligible with the flat frames, so darks aren’t needed for flats (not only is a flat frame shorter in exposure, accumulating less thermal signal in this time, but flats are also brighter than lights, meaning any noise from the thermal environment is proportionally less in the result!) However, when one has a cooled astro camera, one should use “flat darks” anyways, because they are easy to take and store as a library for future use (always use the same flat frame exposure(s) and then your darks will always match!) and you can set the temperature exactly correct. This is preferred because many astro cameras behave nonlinearly for short exposures, meaning they don’t exhibit 1:1 behavior between photon hits and ADU counts like calibration assumes they should. (If this is relevant to your cooled camera, then make sure your flats are longer than a couple of seconds also!) Trying to use bias frames with them is therefore a potential source of calibration issues if affected by nonlinearity, and since there is no temperature-matching challenge to suffer with cooled cameras, and they can be stored as a dark library that you keep reusing, there’s no reason to not use darks with cooled cameras over bias frames for your flat frames. For DSLRs, however, I recommend the opposite, because you can’t match the temperatures, and taking dark frames every time you take flats every night is insane. DSLRs should be well-behaved with bias frames and no appreciable thermal signal should accumulate during your flat frame acquisition.
So, when using a cooled camera, do NOT use bias frames. Instead,
- Use/produce dark frames matching the gain/offset/time/temperature of your lights, and then again while matching your flats. Use the same flat panel setup every time so these can be pulled from the past and not redone every time.
- Create master darks from the above by simply integrating them with the same settings as described above with bias frames. Do NOT subtract bias frames from them.
- Subtract these master darks from the flats, and stack, to produce the master flat. Do NOT use bias frames here, as the bias material is already “stored” in the dark frames.
- Subtract the appropriate master dark from the lights also, and divide them by the master flat. Do NOT use bias frames at all, the darks took care of the bias signal too.
When using a DSLR, however,
- Produce dark frames that match the temperature of the lights as well as possible, usually done the same night. Try not to kill imaging time though! Consider 7 darks an absolute minimum noise-wise, and up to 12-15 preferred.
- Create master darks from the above by simply integrating them with the same settings as described above with bias frames. Do NOT subtract bias frames from them.
- Produce your master bias frames at the same ISO as the flats as described above and stack to produce a master bias and then optionally make a superbias.
- Calibrate the flats with the master/super bias and stack. Darks aren’t needed here.
- Calibrate the lights with the master darks and the master flats, but NOT bias; the bias is already included in the darks.
Summary
Remember the following important points concerning bias frames:
- Bias frames are very important, especially if you don’t use dark frames.
- Bias frames isolate the signal that the camera electronics add to all images so that it can be subtracted from each individual image that is affected.
- Take, say, 100 bias frames at the same ISO value(s) as your light frames and flat frames if not using darks. For each ISO value that was used in your lights and flats, you’ll need a new set. If using darks, you only need bias frames for the flats. If using a cooled camera with regulated temperature, congrats, you’ve transcended the bias frame world altogether; use darks only (for lights and flats).
- Bias frames store for a long time! Keep them around and reuse them indefinitely for each camera.
- Stack them with basic settings (see above) to produce a master bias.
- Use the SuperBias process in Pixinsight on the master bias if possible to reduce noise.