Table of Contents
Note that most of this article has been revised heavily, because I recently discovered that most of the gradient problems with circular rings were actually caused by Nikon and their alterations to the RAW data. However, not all of the gradients were solvable with those considerations, and because I don’t have this focal reducer anymore to test with, I’ll only state what I can.
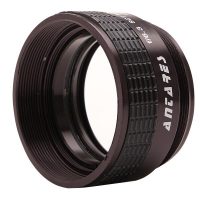
The Antares f/6.3 Focal Reducer for Schmidt-Cassegrain Telescopes is a low-price option for reducing the focal length of your Schmidt-Cassegrain telescope from f/10 to f/6.3. This “speeds up” the optical train by reducing the focal length and magnification of the scope, requiring less time to integrate the same signal. A focal reducer along this line is probably the most common accessory bought for SCTs because for beginners, it makes tracking and imaging more manageable.
Specs
For the last few years at the original time of posting (beginning of 2020) it has been running between $80 and $95 and although discontinued by Antares, it still is available new from various vendors at the time of this writing. It consists of 2 identically-shaped convex lenses inside of the metal casing, held in place by two threaded rings which screw into the inside of the casing.
It is roughly 33mm long, but about 9mm of that is male threading which ultimately ends up inside of another part. It is about 2 inches in diameter because the male (camera side) and female (telescope side) threads are standard SCT threads (2″, 24 TPI). This allows it to attach directly to the back of many SCTs like the 8se, and to have other SCT-threaded accessories attach to the rear side. Note that many accessories are M42 threads, however, and will not fit on the camera side of this reducer without an adapter. The most common choice is a t-thread extension that has M42 threads on the other side.
Be careful with the required backfocus distance too if you want to maximize its performance and get the exact right focal length for your telescope (remember that if you’re using a DSLR, you also have distance from the front of the camera body to the sensor to account for). I have retracted my previous statement here giving the specific required distance (stated as 82mm from the front) because I’m now doubting it, despite the two cloudynights posts on the subject (search around for them).
Getting this right also prevents adding aberrations and more appreciable vignetting. Other distances are manageable, but lead to strong field flatness issues and different focal length reduction. I had it way farther out than appropriate, which gave me 0.5x reduction which I liked, however the field is not even close to flat and the performance suffers. This last fact is not the fault of the reducer, but I wasn’t as knowledgeable about this important fact back when I had this item.
Strengths and Weaknesses
In my years of using it, I can say that I know its capabilities well and I’ve found it to have the following strengths and weaknesses:
Pros:
- Very inexpensive for its class
- SCT threading conveniently attaches immediately
- Excellent optics for high-light situations like the moon and certain bright DSOs
- Great for visual use
Cons:
- Does little to correct for astigmatism or imperfect field flatness
- Lower quality optics start to show in fainter DSO images when images are strongly stretched
Strengths
This is a great piece of equipment for taking images with brighter subjects. Here are some examples:

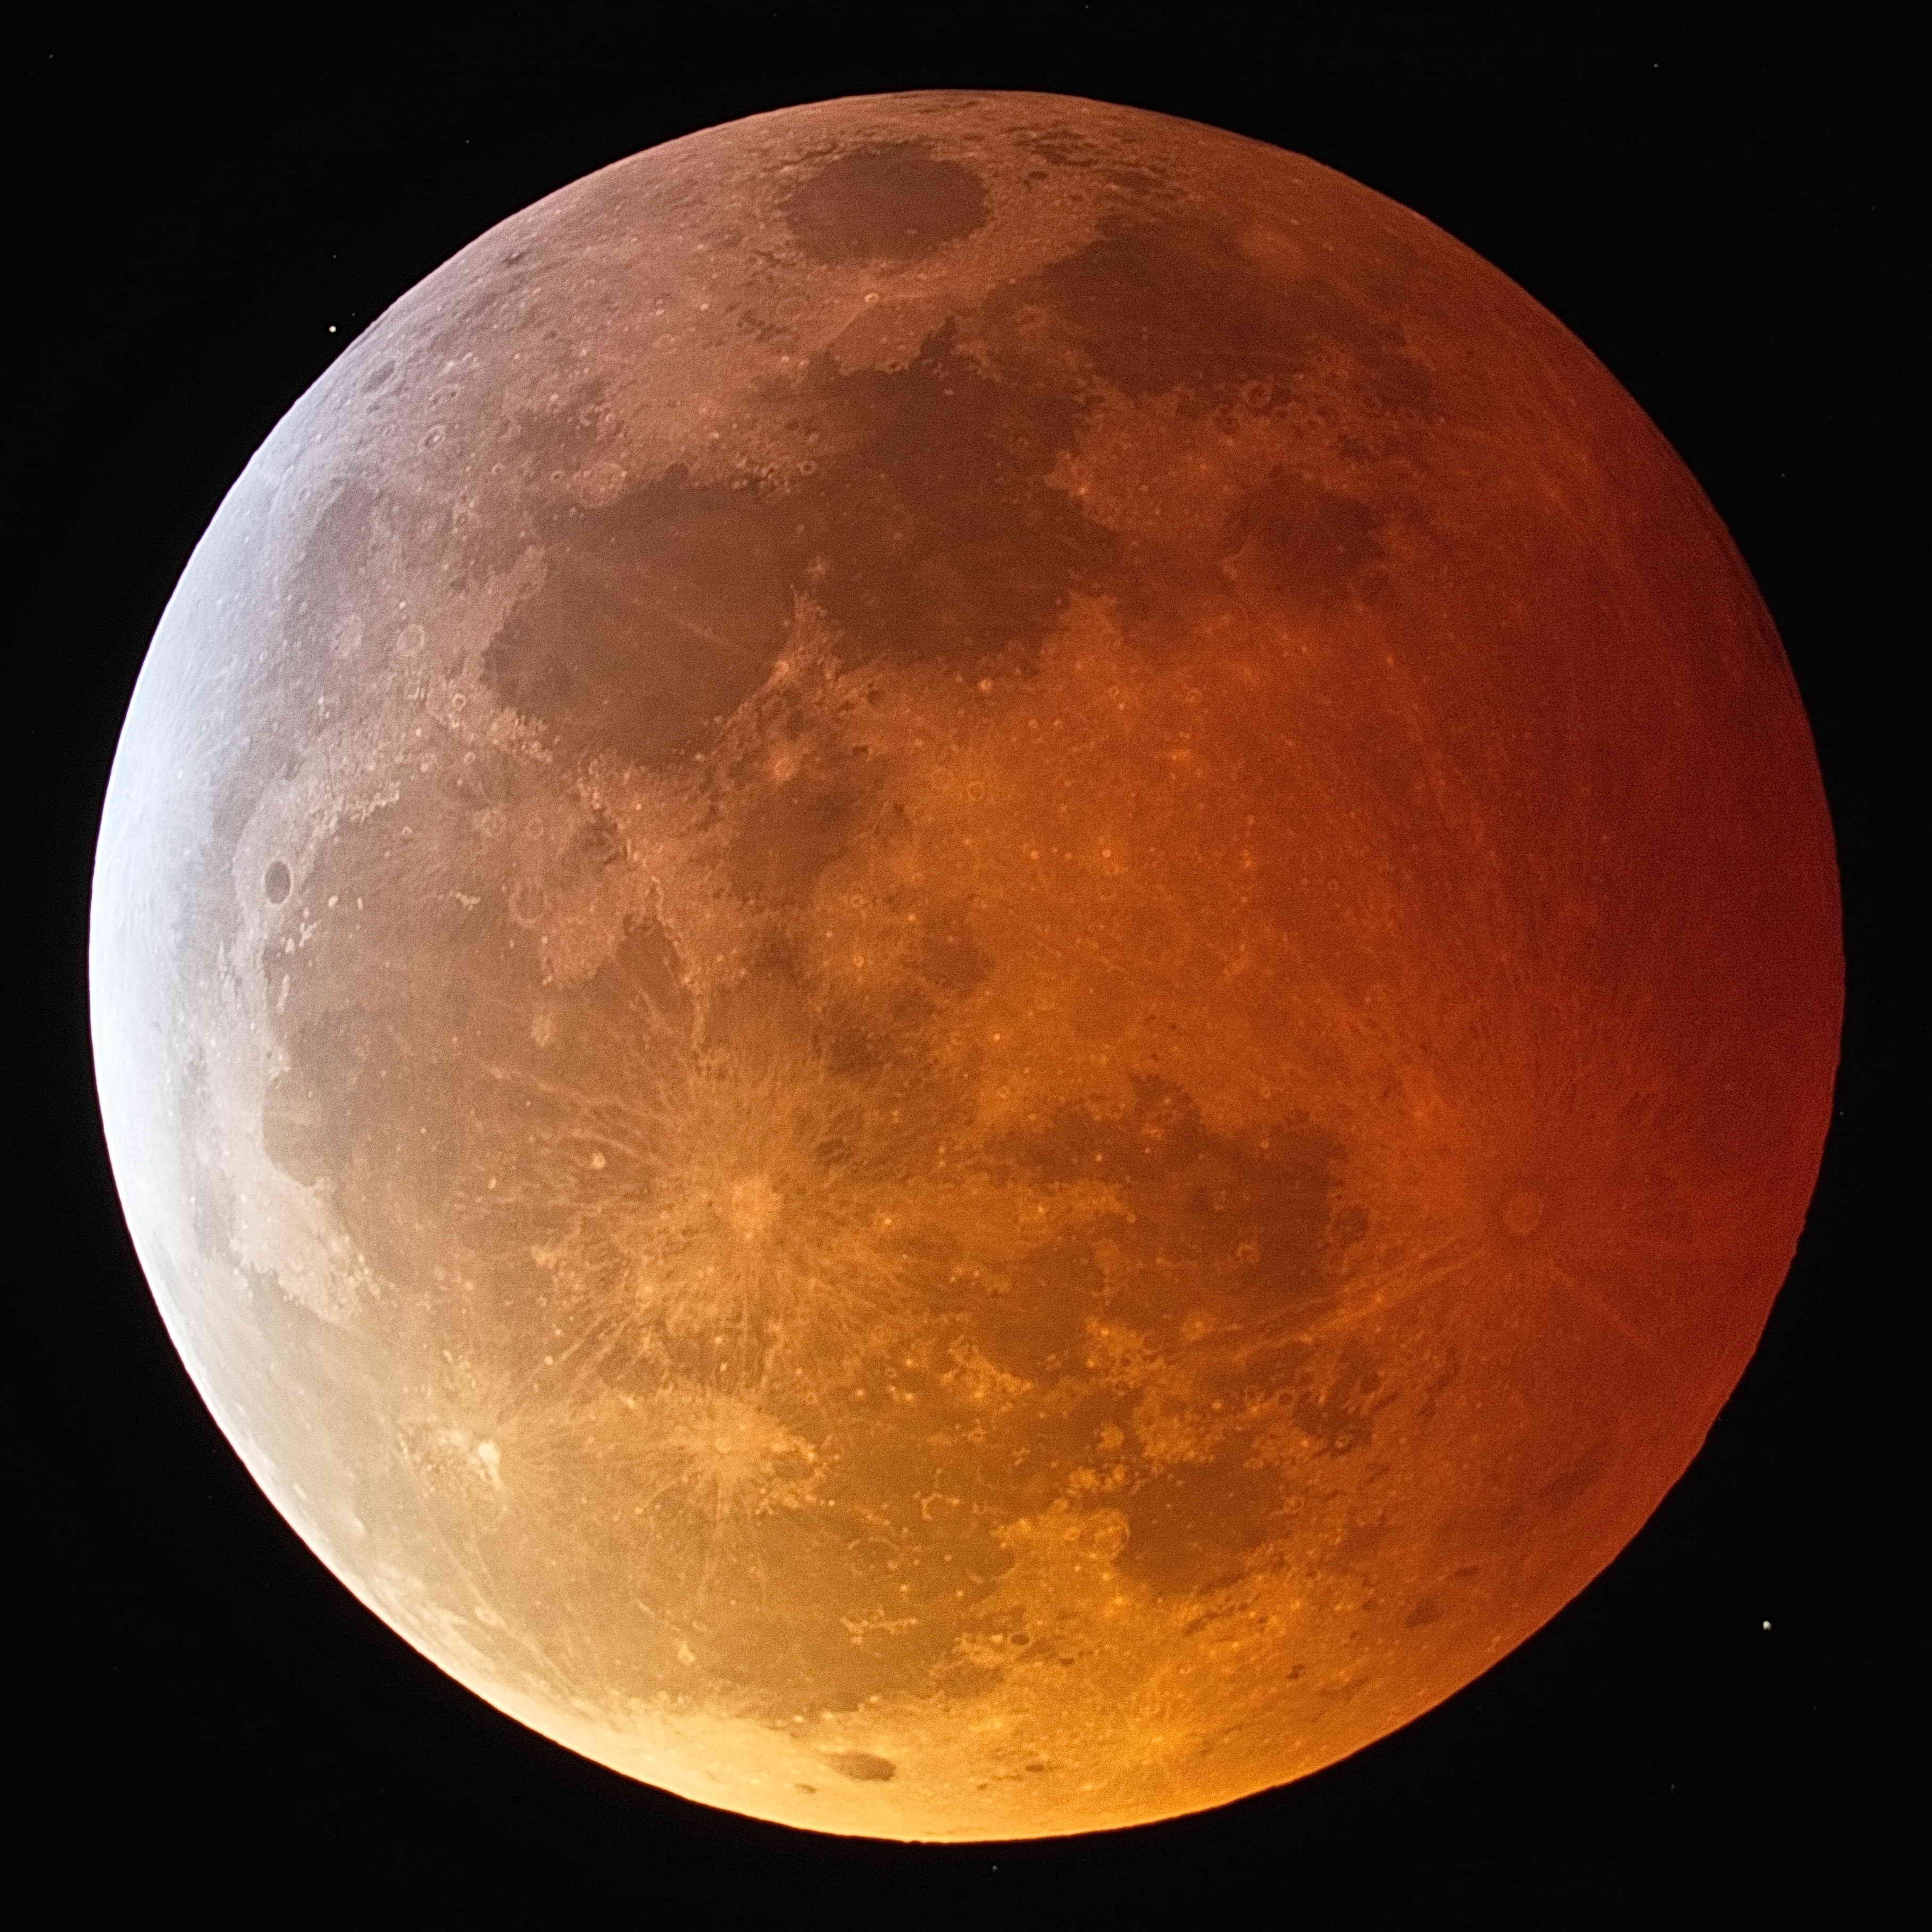
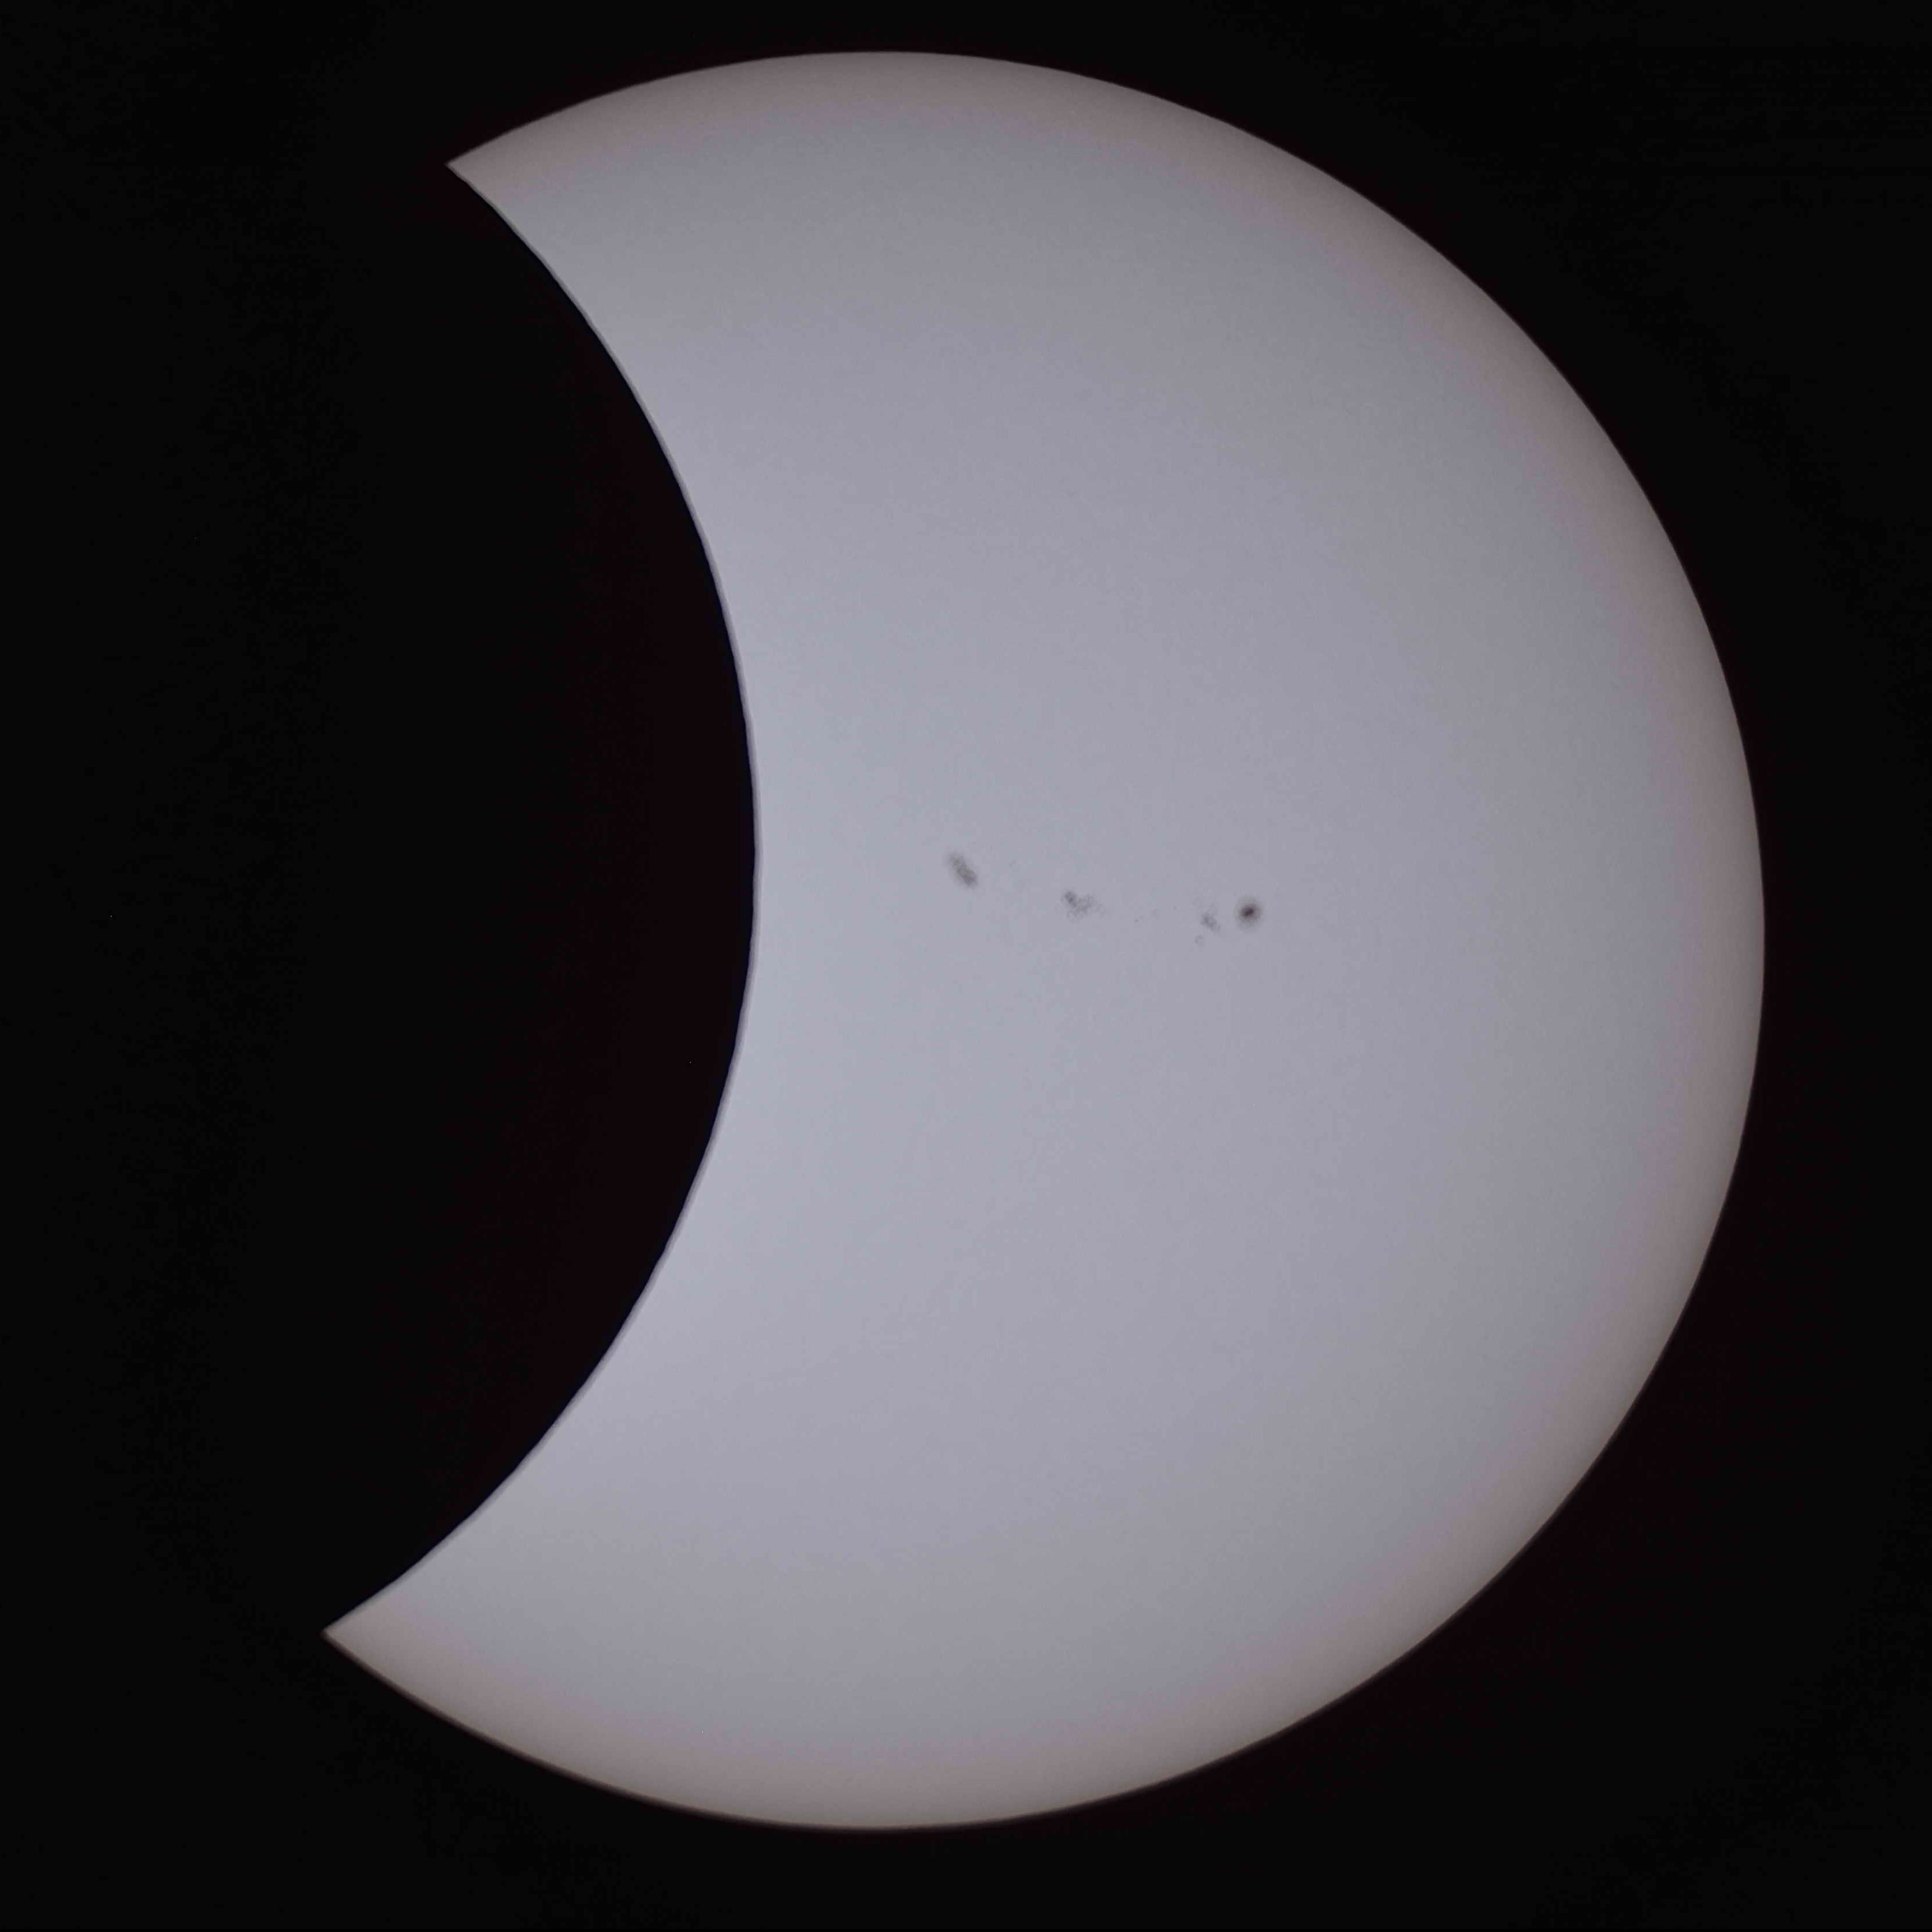
All of the above were taken with the Antares focal reducer on the Celestron 8se SCT with a Nikon DSLR at prime focus. From an equipment perspective, they look great!
This reducer is also great for visual work of course, and no real imperfections show up as the eye is much less demanding than a camera with long integration times. This is a great and very inexpensive choice for such situations.
Weaknesses
However, where this focal reducer struggles is in hyper-stretched images with a weak signal such as deep sky work. Some brighter DSO targets are passable with this reducer, but it requires using aggressive background extraction and careful handling of the resulting imperfections.
It is at this point that I’m unsure which effects are from the reducer and which are from the Nikon issues I discovered in 2024. I am certain that some of the chromatic rings are from the latter and not the Antares reducer, however.
Passable Cases
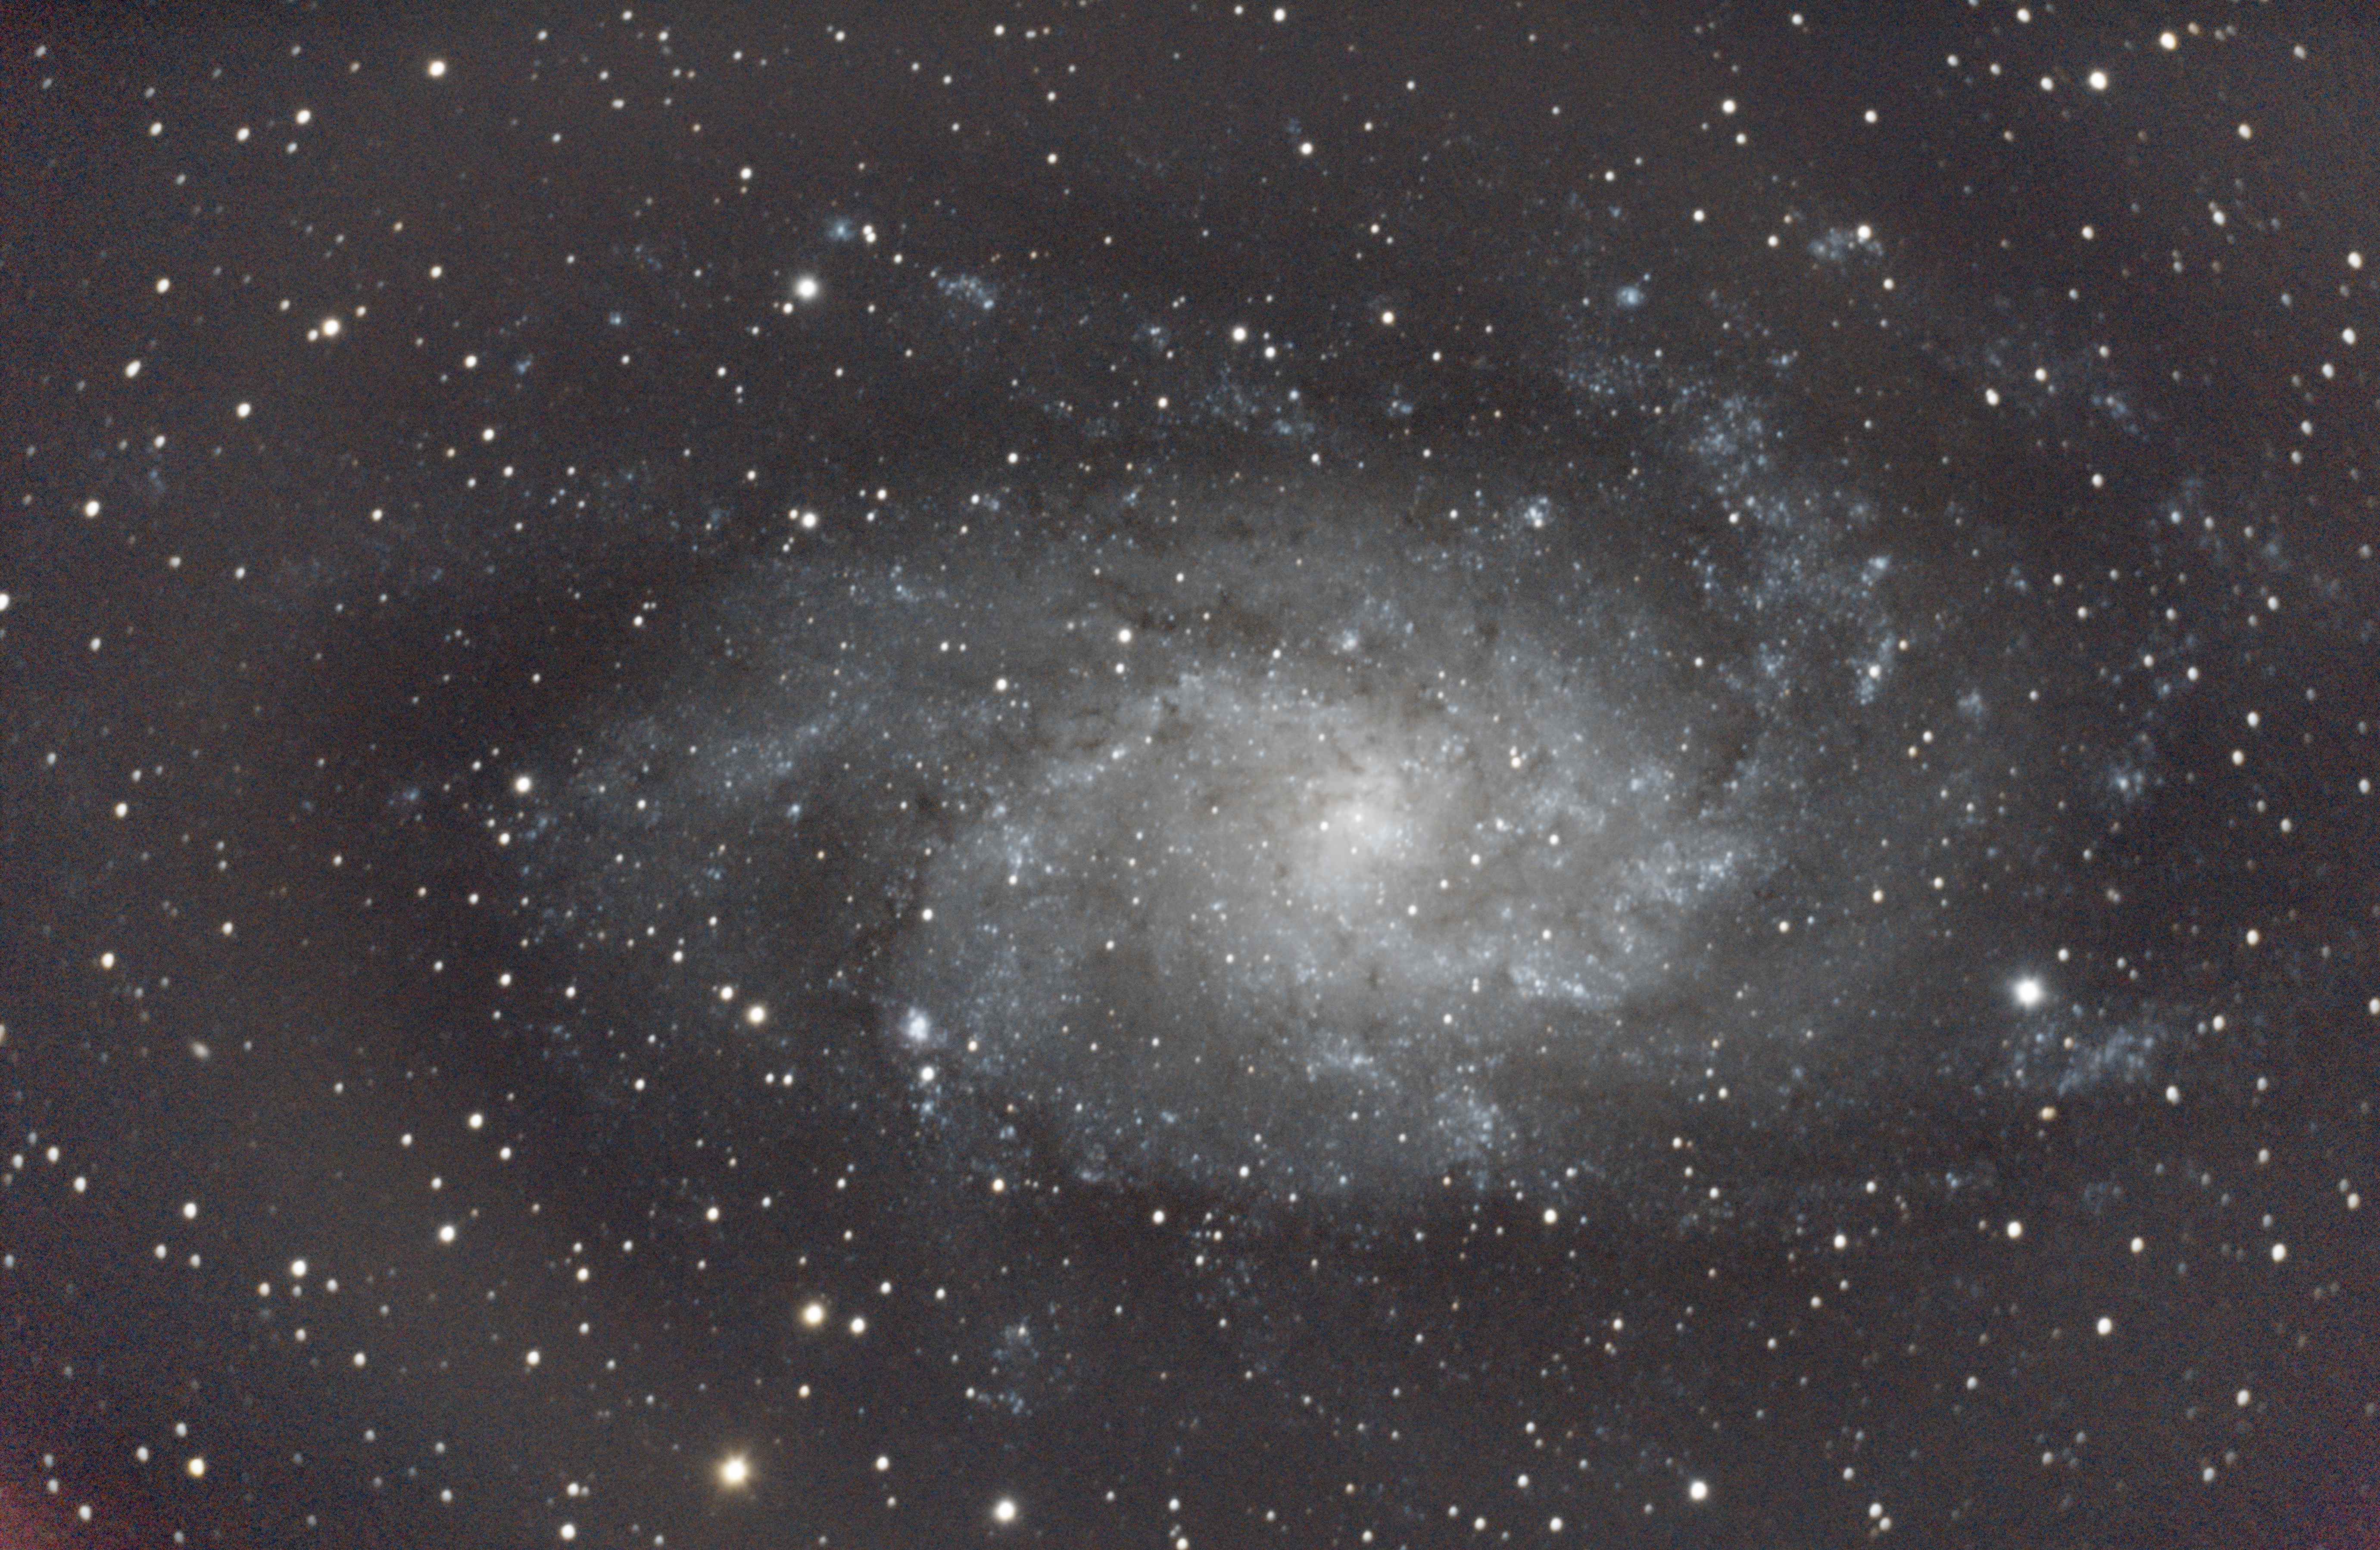
Here is an example of a raw light frame of M33 at a very dark site:
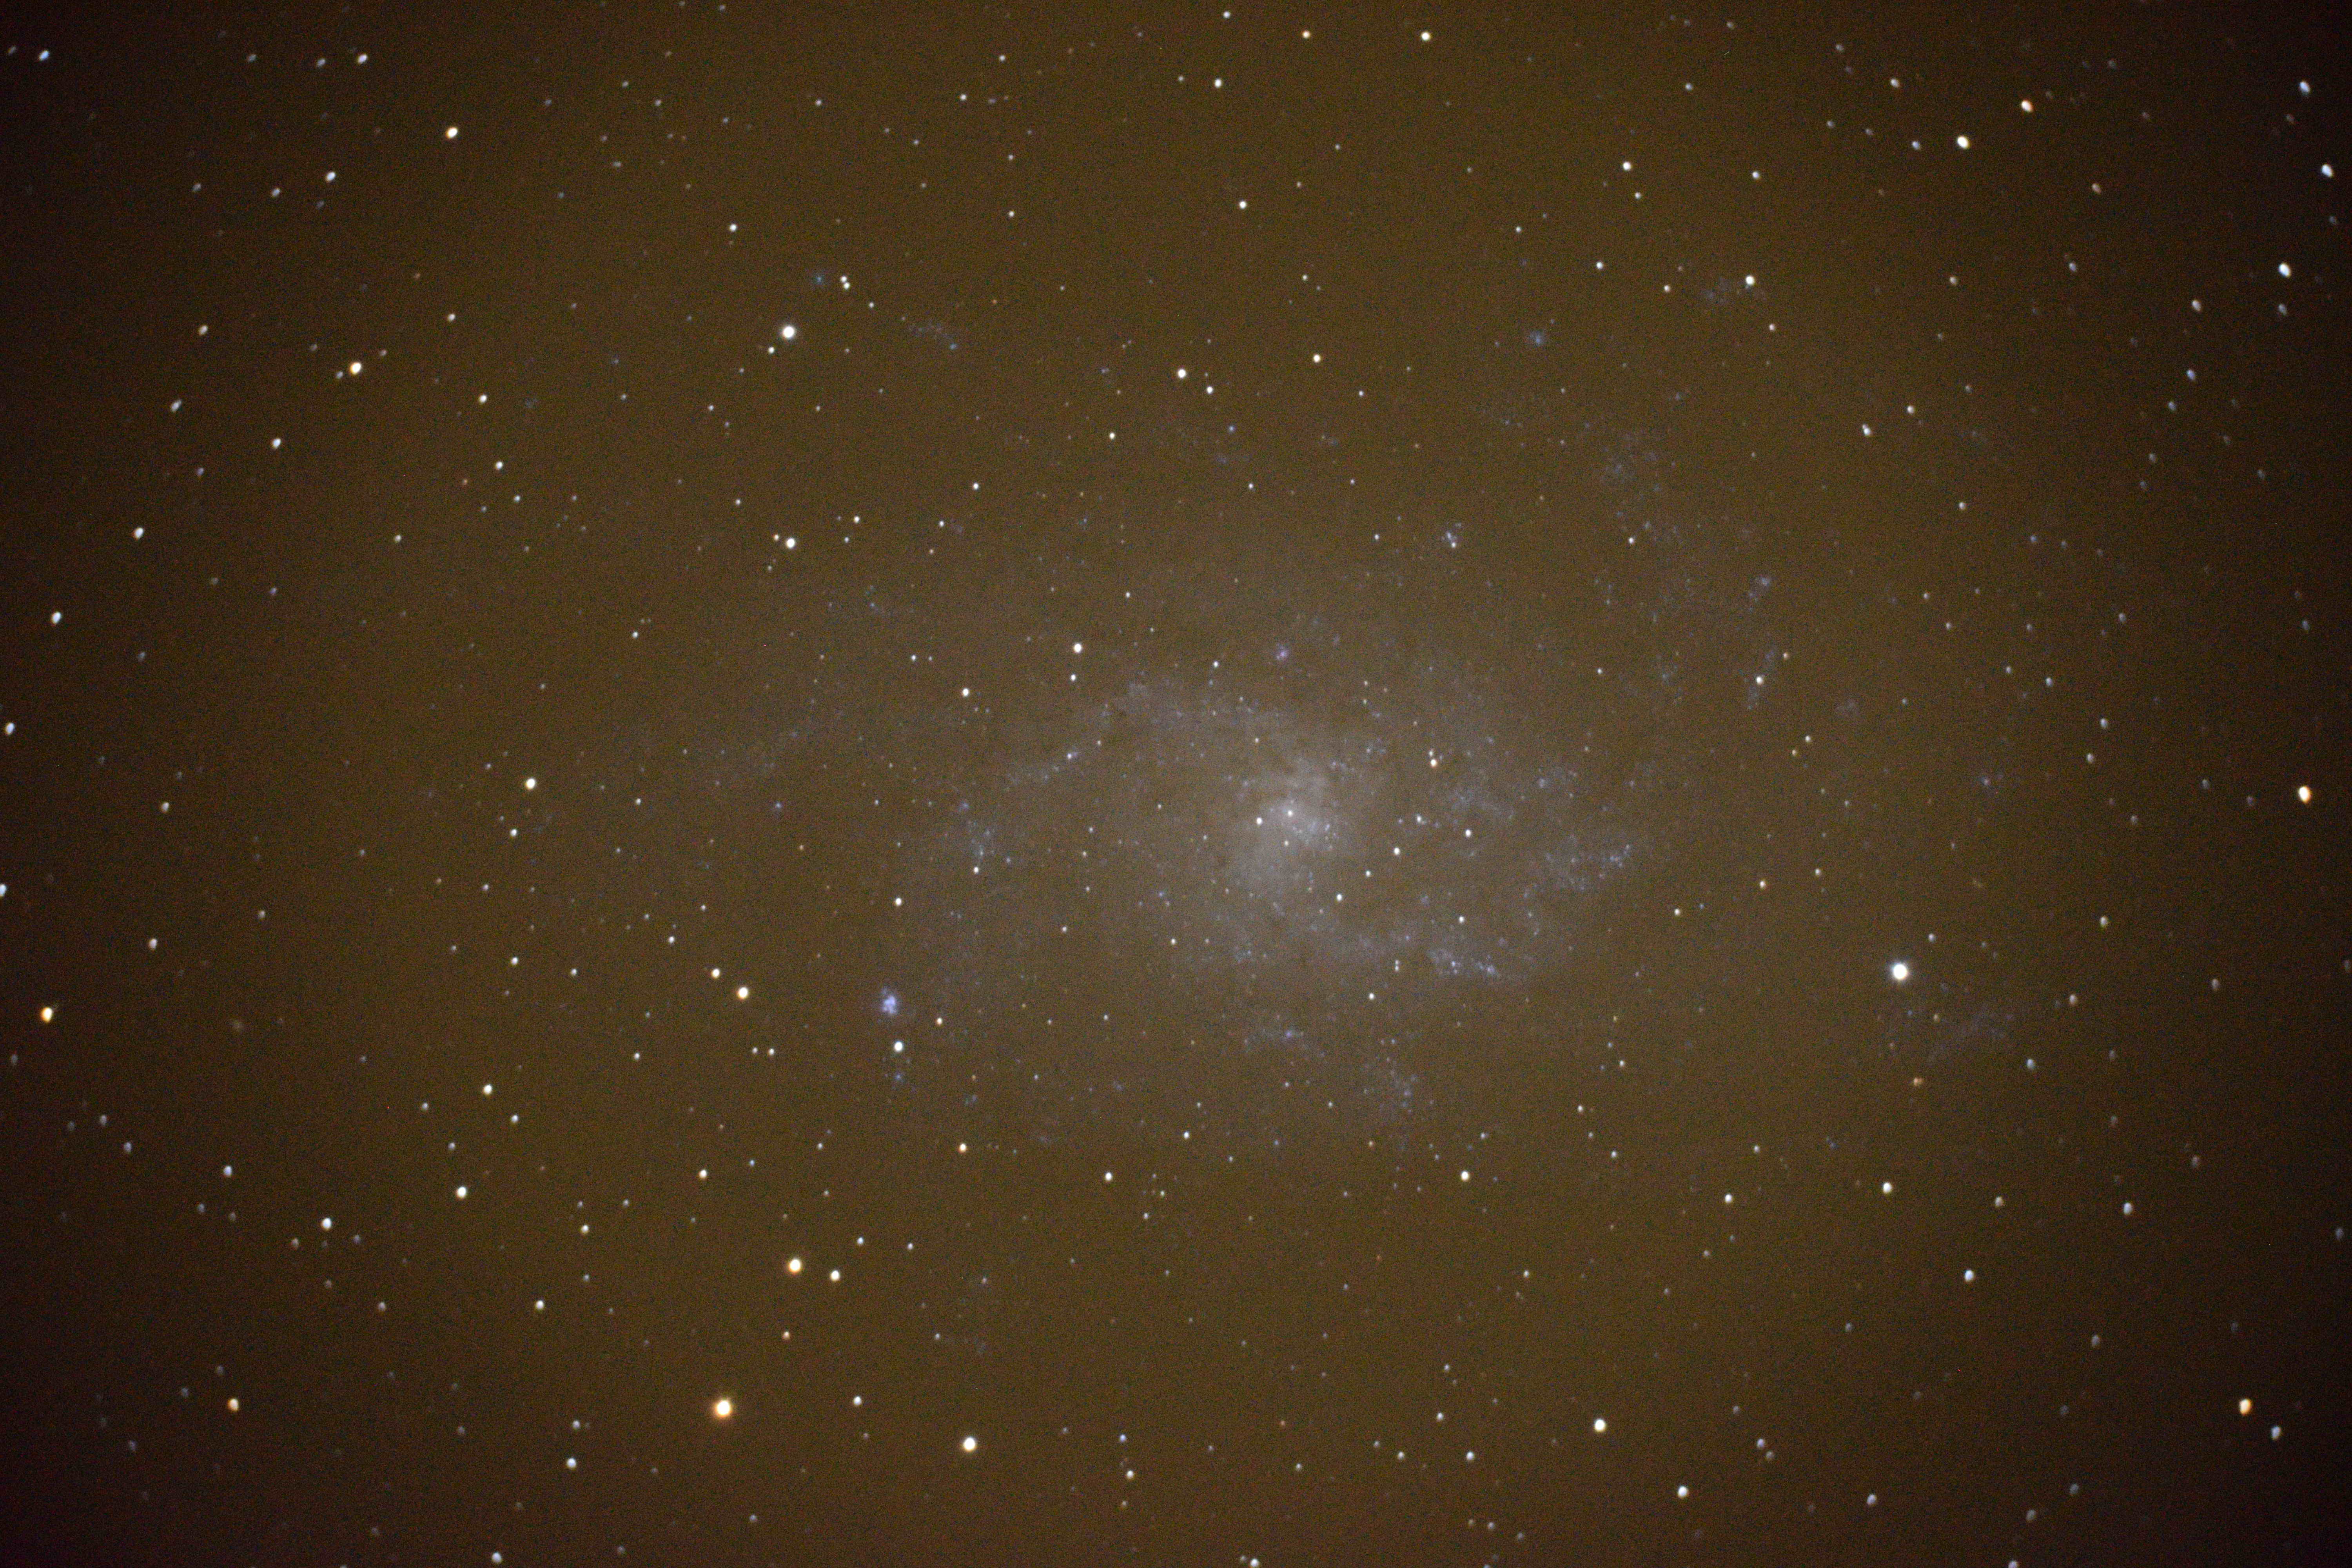
This is a very dark site. The galaxy is indeed a bluish tint. The image is vignetted as expected, and it’s also worth noting that I was not attentive in keeping the correct backfocus distance here, so the astigmatism (“swirling” rotation of the stars on the outer edges) and effective focal length are not to be compared to what is advertised or expected.
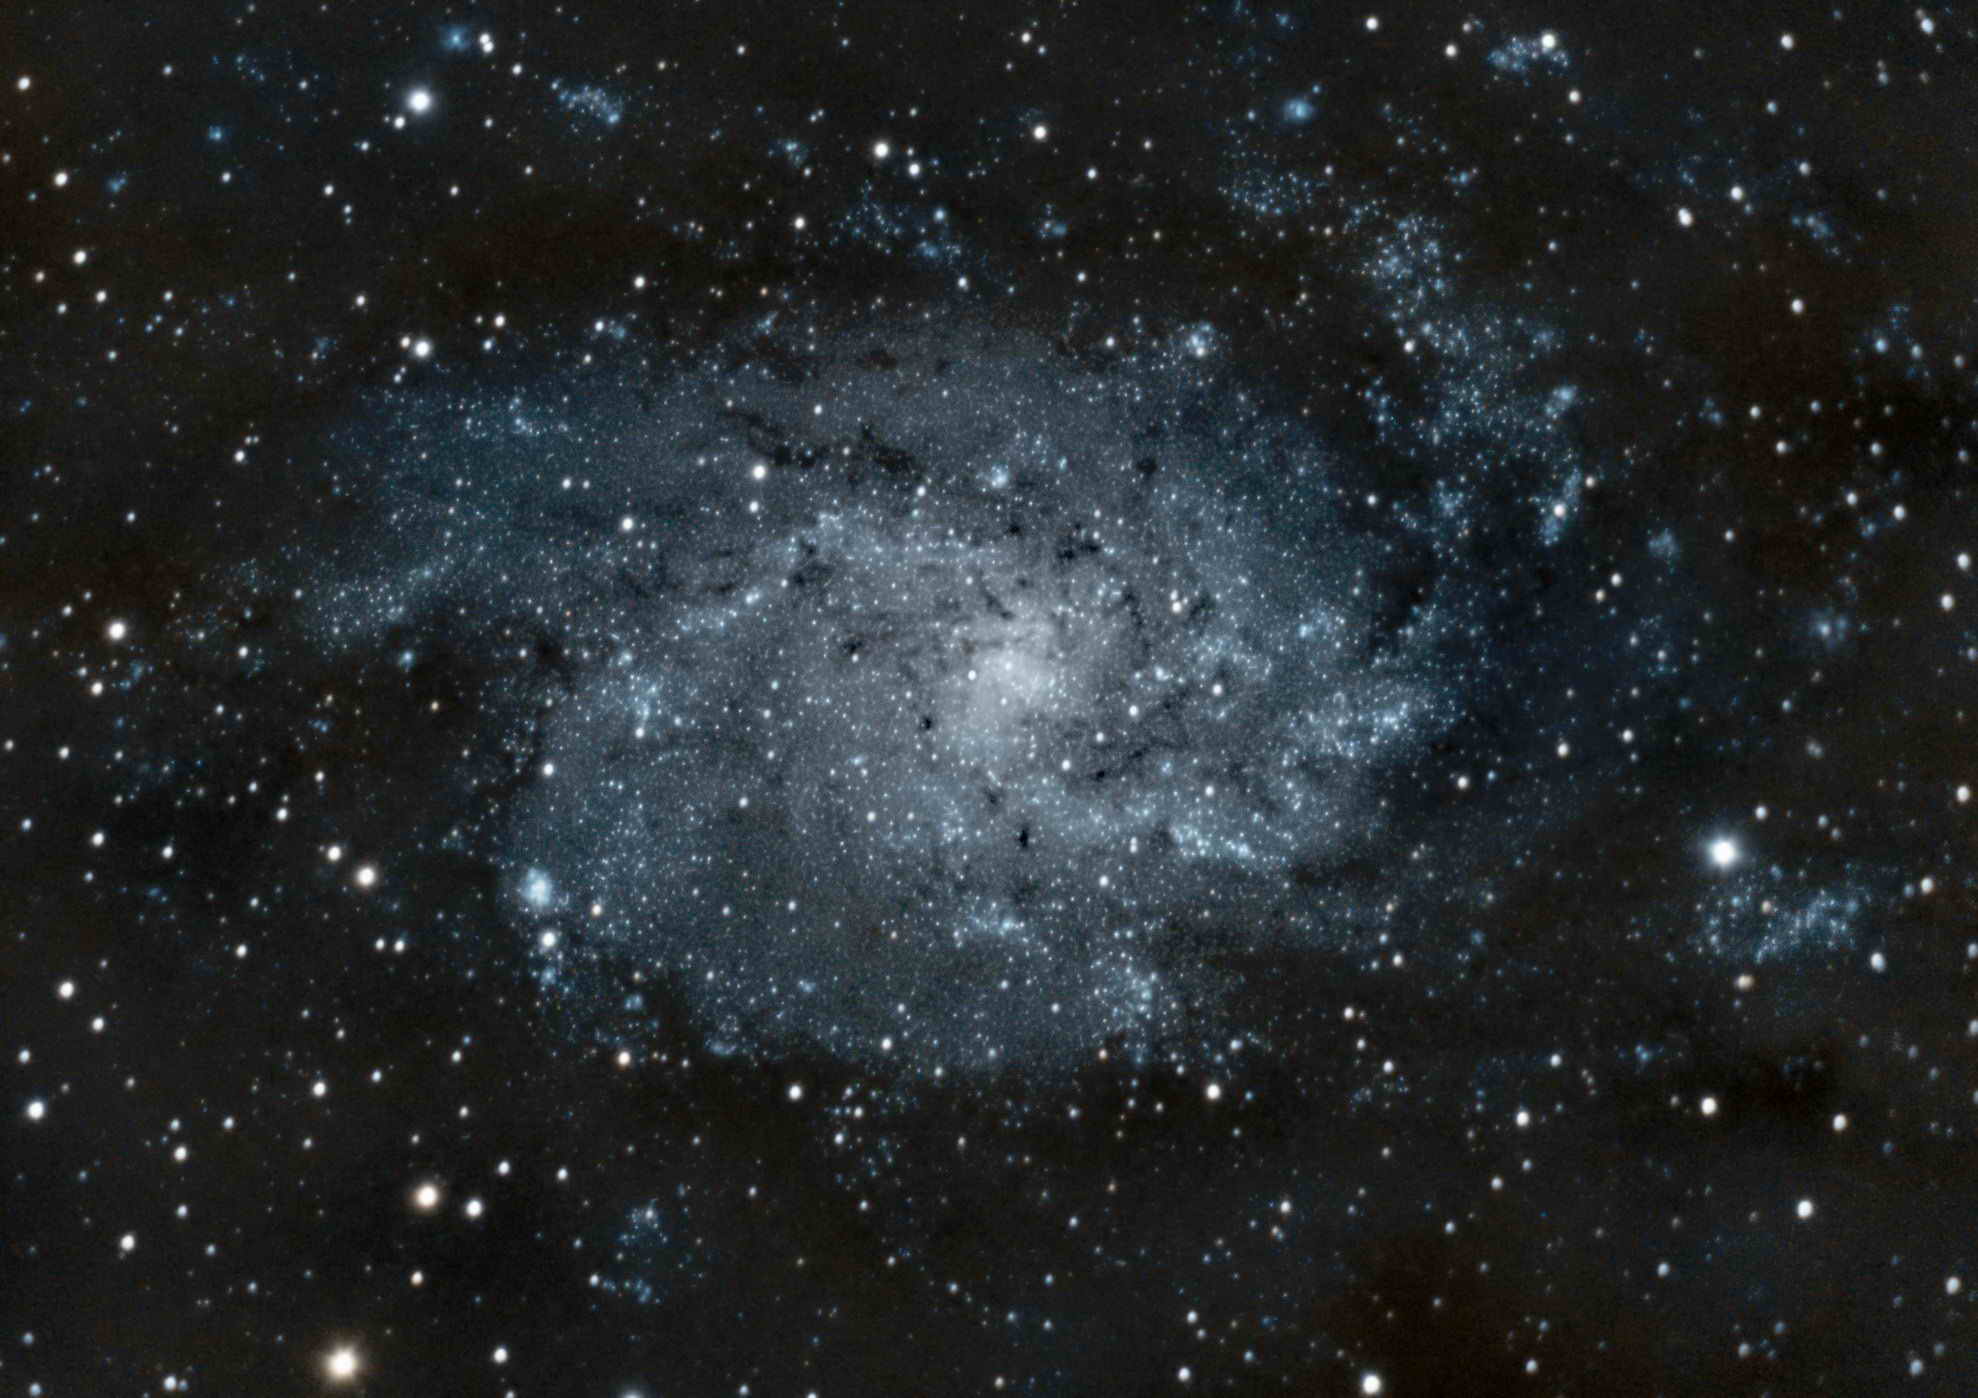
Here is the stack of just over an hour of data, calibrated with flats, with background neutralization and automatic background extractor applied in Pixinsight:
Clearly some artifacts remain, namely the large ring-shaped gradient around the image. This artifact is not caused by ABE in Pixinsight; it is removing an even, gradual gradient from the vignetted image to reveal darker and lighter sections that are very subtle. I cannot know how much of this was from Nikon versus the focal reducer, however.
After aggressive background extraction with dynamic background extractor, I was able to manage it fairly well in this image. Here’s a final result with this data:
Other scenarios were not so easy to handle, especially when the total integration time gets greater Even with dithering, these large artifacts really “add up” and get “amplified” in the stack. Let’s take some worst cases. Here is M13, with flat calibration, stacked, background neutralization, and automatic background extractor applied:

Note that the straight-line artifact in the upper left corner is NOT from the focal reducer; I hadn’t yet aligned the pick-off prism in my off-axis guider. The astigmatism is again exaggerated because the proper backfocus distance wasn’t respected. The ring artifacts are crystal clear here, and they go away entirely when the focal reducer is removed, all else kept the same. I can confirm that much of this chromatic ringing here, although not all, was NOT caused by Nikon issues, because running it through a tool designed to resolve that problem did not fix all of these gradients. Also note that at the correct backfocus distance, this image would be more “zoomed in”. I am unable to test with these parameters corrected again.
Aggressive background extraction still produced a nice result that I like, however!
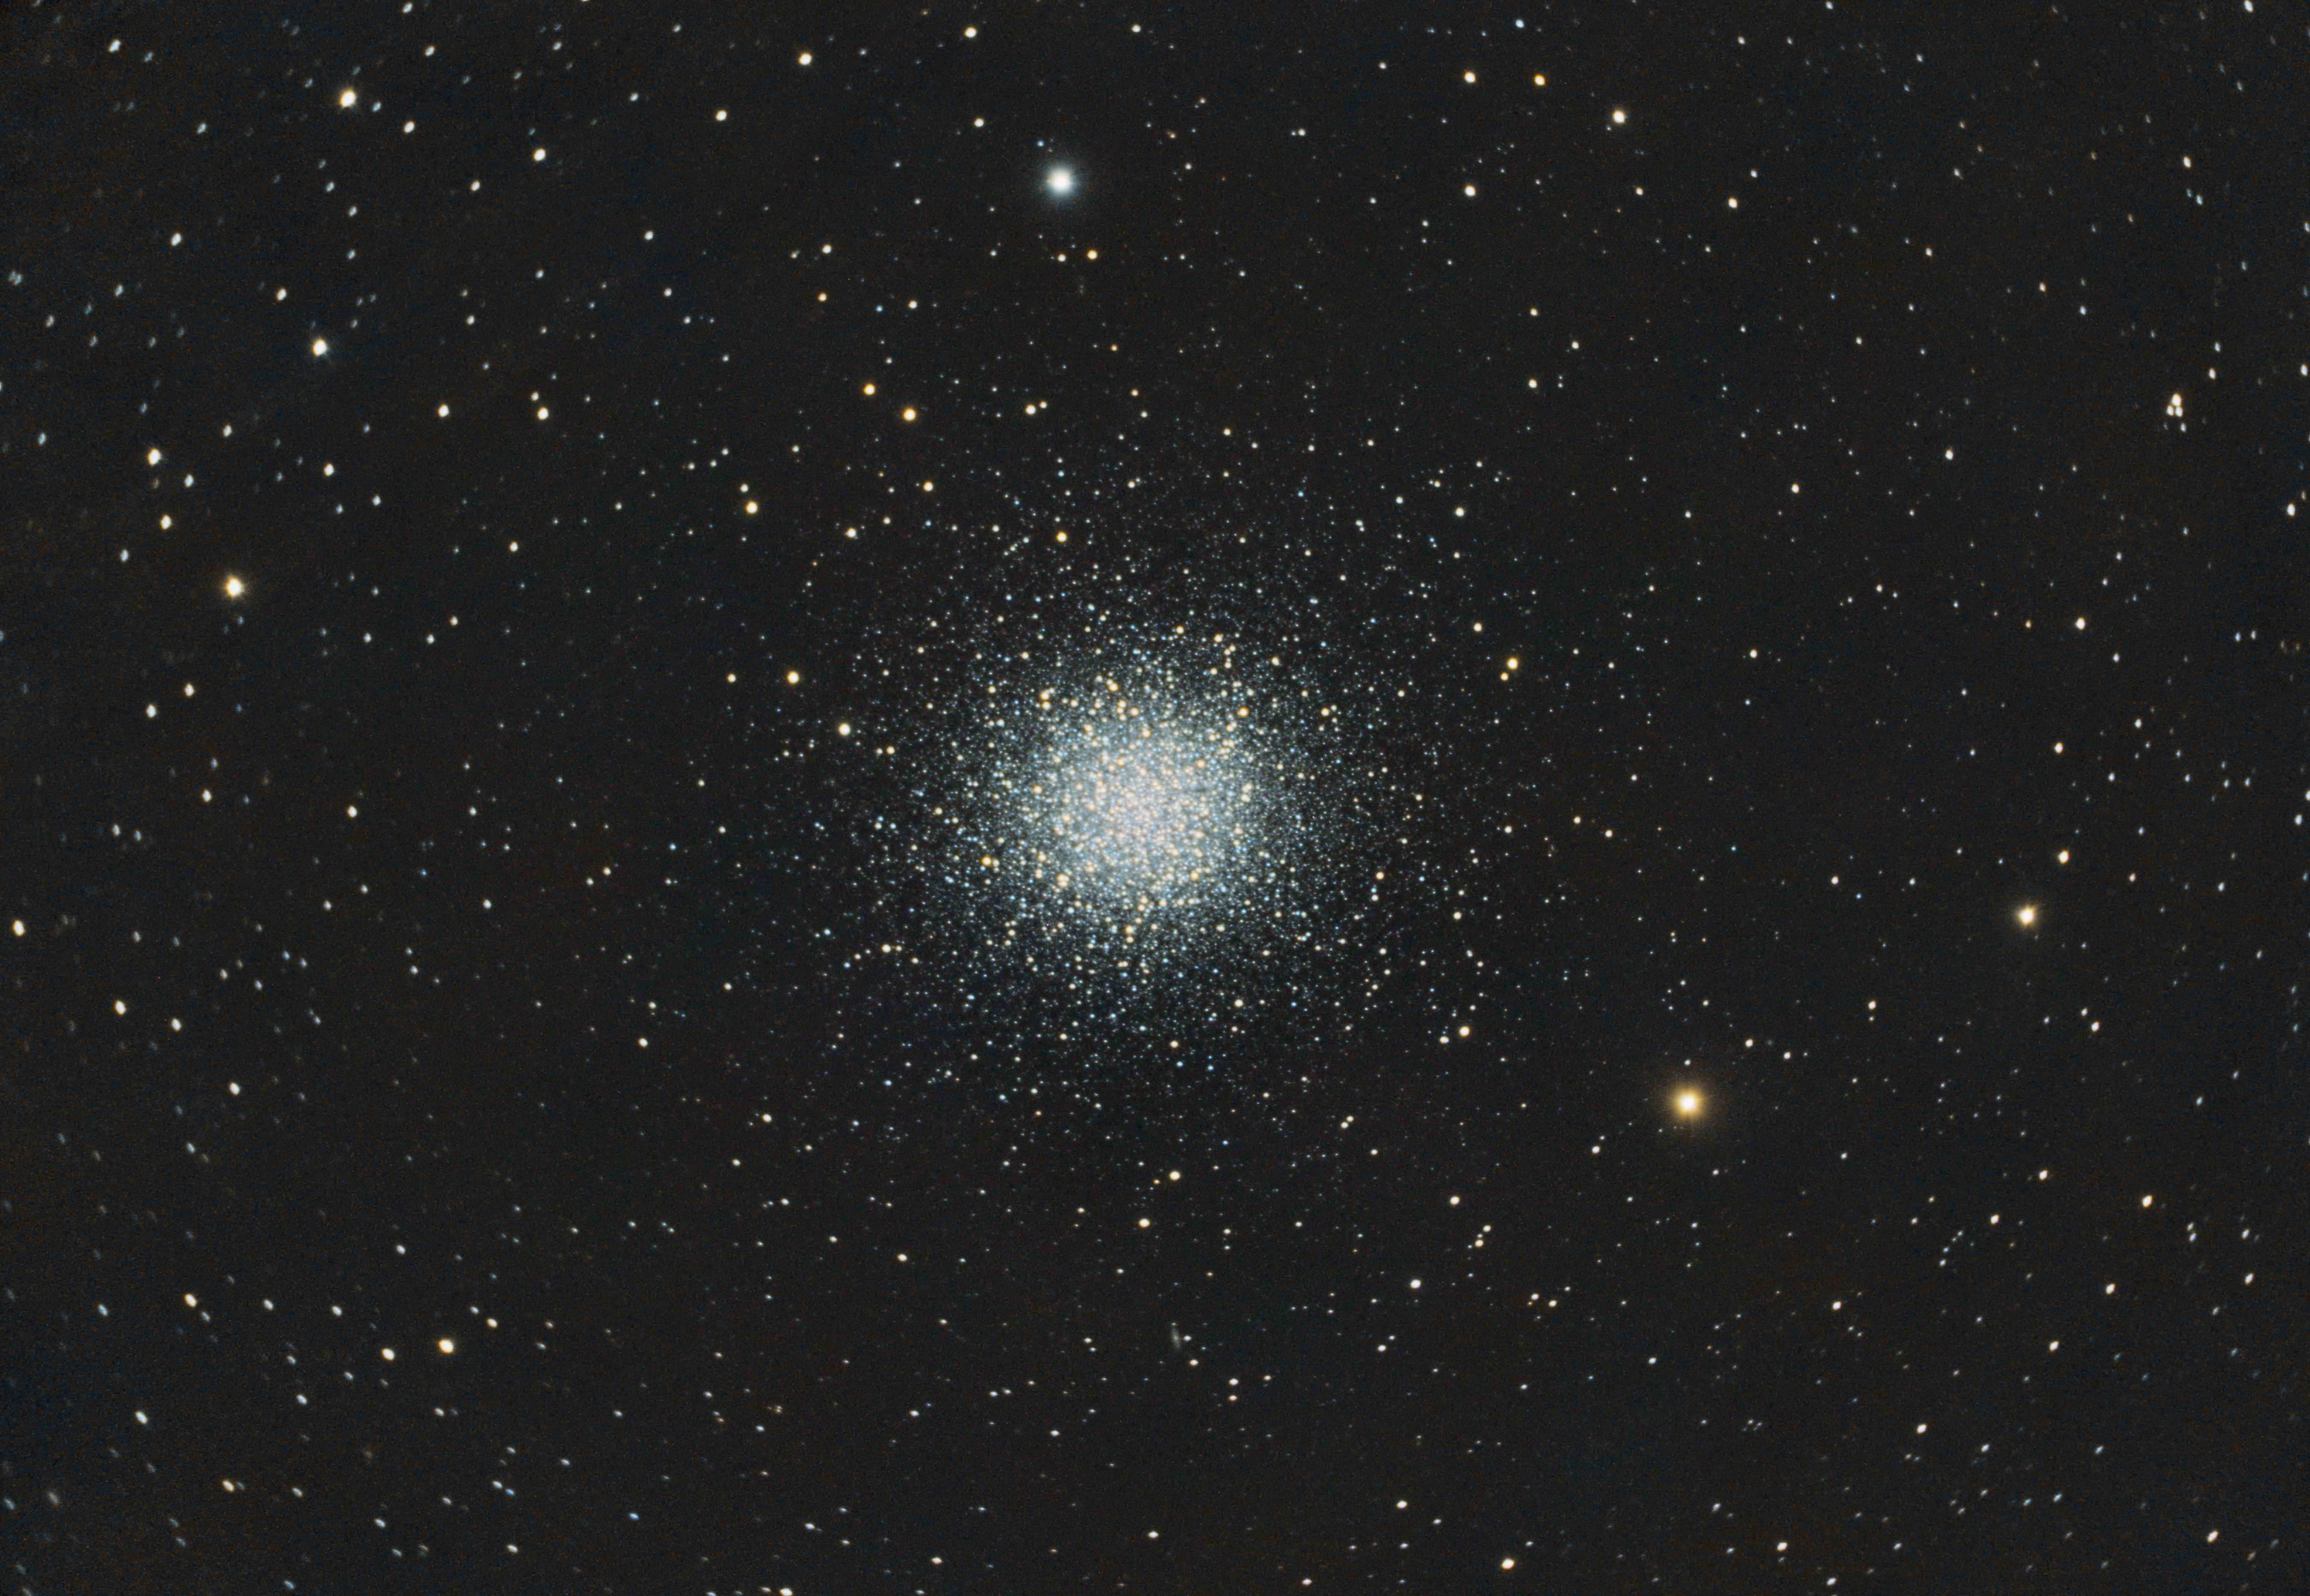
The pick-off prism artifact is still slightly present, and the splotchiness of the background is from a necessary aggressive background extraction, but the result is still admirable!
Less Usable Scenarios
I previously used an example here that was proven to have its shortcomings, namely chromatic ringing, caused by Nikon and not necessarily the focal reducer. Although I believe the reducer still introduces some issues, far fewer of them are from the reducer than I previously thought. I have no further examples to provide in this section, therefore, which is in the reducer’s favor!
What About Flat Correction?
Some focal-reducer-introduced artifacts are resistant to flat correction. My flat correction techniques are very meticulous and careful. I’ve also tried just about everything to try to reduce these artifacts with flats (of different exposures, different ISOs- turns out higher ISO flats are better but not perfect-, TV flats vs sky flats, more and fewer t-shirts, bias subtraction from the flats, etc.- trust me I’ve tried it all). None of them worked.
The main reason for this is because certain internal reflections (for example, light hitting the image sensor, not getting absorbed/counted but rather flying back towards the reducer, hitting its glass, and then firing back towards the sensor again) are intensity dependent in their spacial distribution. This means that flat frames, which have greater light intensities than the light frames, cannot properly model, and therefore correct for, these gradients. Only flats with a similar photometric profile to the lights could hope to model this properly, but this is practically impossible to achieve.
I have removed an example here that showed aggressive chromatic rings, as at least many of them were caused by Nikon!
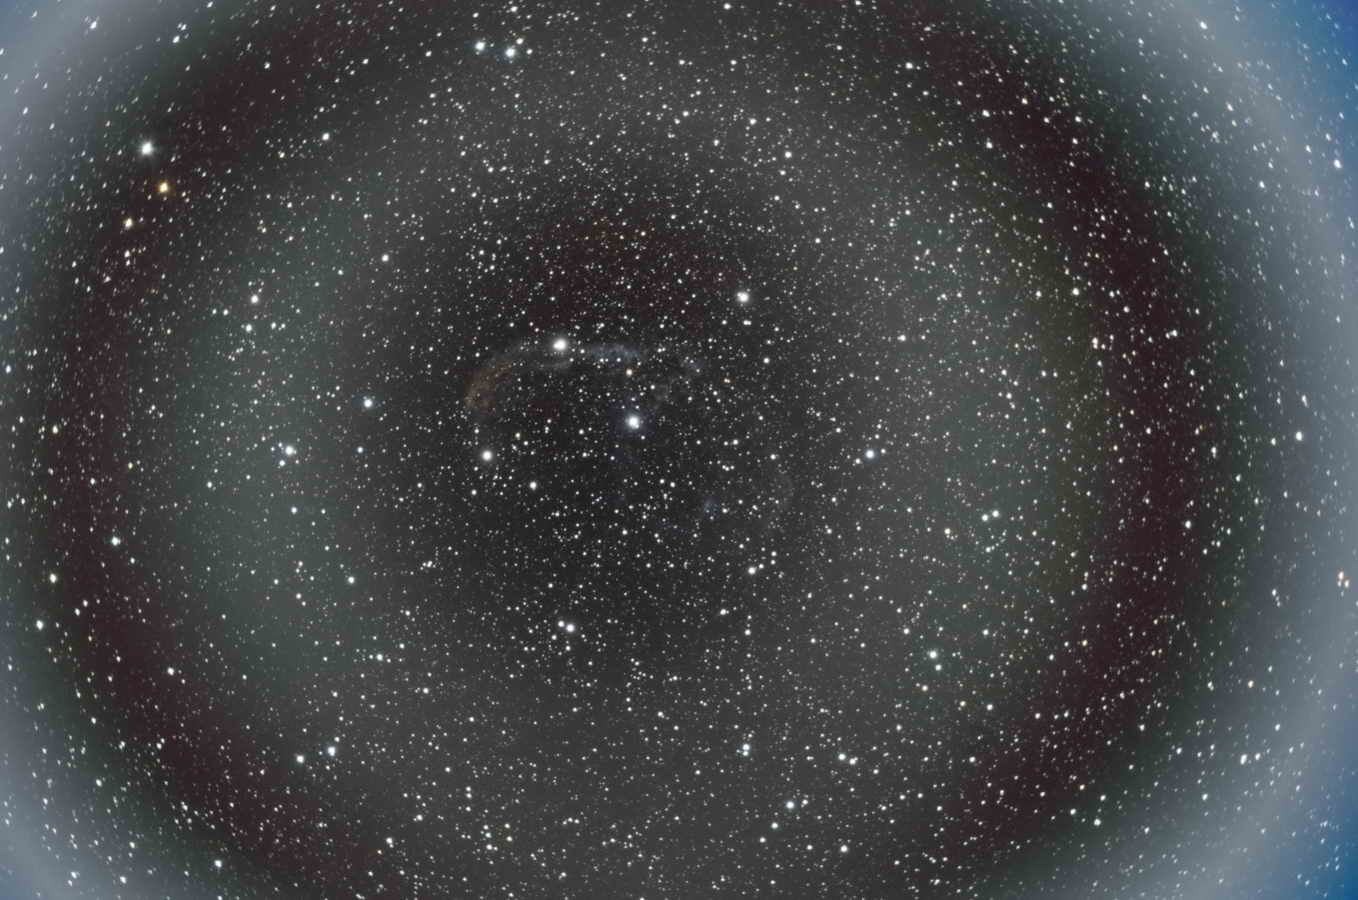
Here is a processed image of the Crescent Nebula that suffered from some problems, but turned out alright.
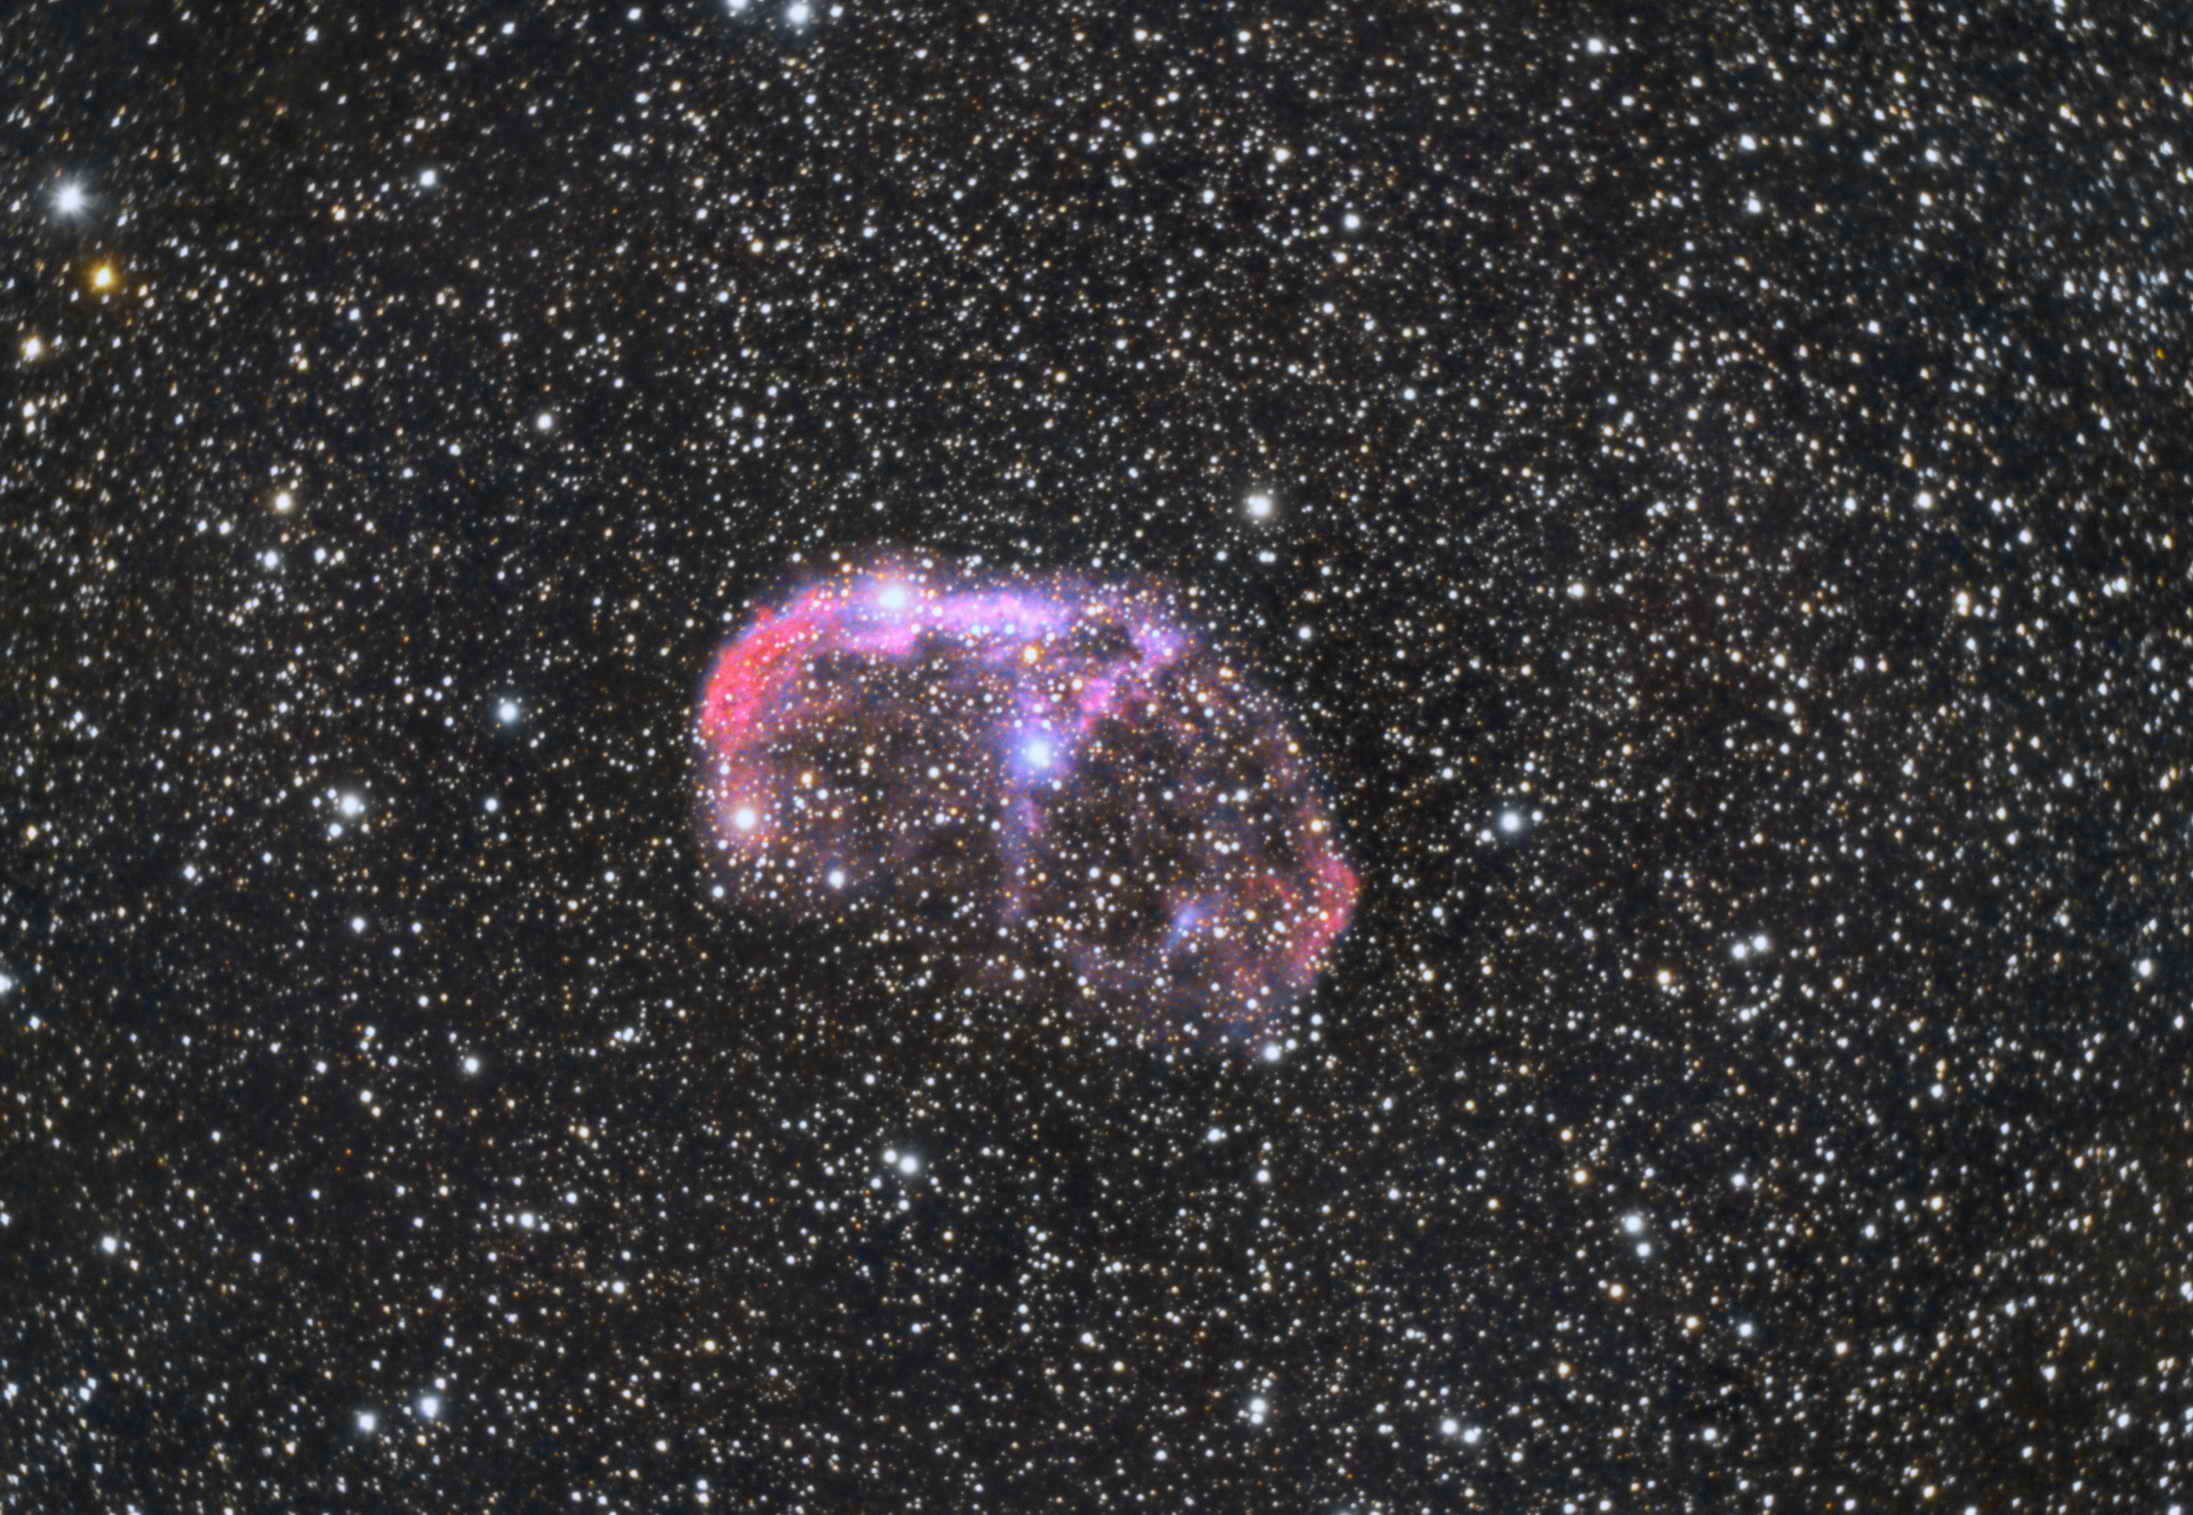
This was great for the stronger nebulosity in the center, but it misses much of the surrounding nebulosity as a result of the background extraction. However, more importantly for this section, here is the same image stack without flats (automatic background extraction applied twice and autostretched in Pixinsight):
What Causes These Gradients?
This section previously gave a description about reflections on the glass leading to gradients that cannot be corrected by flats, however I have now proven that many of the issues faced here were actually caused by Nikon tampering with the RAW data before writing the NEF files, which was a complete surprise to prove and demonstrate. Therefore, I will forgo further discussion on this focal reducer regarding these issues because I cannot verify too many cases that were strictly or exclusively caused by the old theory.
Why do Flats Fail When the Reducer Causes Gradients?
It seems like flats should correct any unevenness. They correct vignetting and dust, after all! But as you can see from the explanation above, these gradients (at least some of them- most were actually caused by Nikon!) are caused by reflections of the signal off of the camera sensor, off the focal reducer, back to the sensor. As a result, the strength and distribution of this effect is dependent on the exact subject being imaged: the distribution and brightness of all of the stars, nebulosity and other features in the subject. When flats are taken, they’re taken with a uniform and even (and very bright) light source by design. This does not properly reproduce the same effect (to the same extent, at least) in the flats, which leads to imperfect calibration no matter how well the flats are taken, because they don’t contain the same light intensity distribution as the lights (and they’re not supposed to); these effects are intensity dependent.
I should also mention that using too large of a backfocus distance led to excessive focal reduction, placing a large portion of the light cone that is useless into the sensor. By useless, I mean not within the parameters of the reducer for properly corrected field. I give it a lot of grace because of these issues, therefore. I would retest if I still had it.
Final Words
This focal reducer is great for visual usage, bright solar system targets, and brighter DSOs. However, fainter DSOs that require extreme stretching, large integration times and faint nebulosity may be tougher to deal with, although not as much as I previously thought.
Because of its low price point and great image quality for bright subjects, this is a great choice for beginners working with SCTs who want a reliable focal reducer. However, the cheap nature of the hardware and 2-lens design will definitely become apparent for highly-stretched images with larger integration times, although I must admit that most people leave SCTs for deep sky imaging long before I do, and I push my 8se to the max of its capabilities.
This is therefore an excellent introductory or cheap option. If you want a more expensive option that offers greater optics and field correction, check out my review of the excellent reducer from Starizona here!
Christian says:
Hello Alex,
thank you for all information about Antares reducer.
You’re said that the distance is 49mm since reducer back to the sensor. I had believe understand that the 82mm was from the back and not to the front. For a Canon DSLR the distance between sensor and dslr front is 44mm. If I understood, I do must insert a 5mm ring between the reducer and my dslr ? Is ok for you ?
Thank you again
Christian
Alex says:
Hey there, so I haven’t owned this in awhile so I can’t test, however I believe I updated something in this article that wasn’t accurate, and if my memory serves me, this statement is now accurate:
“leading to a necessary distance of 82mm from the front of the reducer to the imaging camera’s sensor; this only leaves around 49mm of distance from the back of the reducer to your imaging sensor, making the standard Celestron t-adapter far too long to place the sensor at the right place if you want to maximize its performance and get the exact right focal length for your telescope”
I’m trusting my old writing here, but I believe then it’s NOT 82mm from the back. Not 100% certain though… You may have to try both ways to find what’s best for your setup, or consult other who have used this one with their experiences.
Alex says:
You may find this helpful:
https://www.cloudynights.com/topic/265166-f63-reducer-spacing-for-sct/#entry3367628
Jurgen Schmoll says:
Thank you for this article, which explains a lot! I have a 14″ Meade SCT with a Canon DSLR, and I was driven mad by those rings. I used the Antares reducer, and now changed to a Celestron I borrowed.While the Celestron copes better with the larger field curvature of the large SCT, the rings are still there. I thought already they may be ghosts created by the optics, and now I get why flats do not work here. I wonder if an optical design with a larger curvature of the last glass/air surface would help to spread this ghosting out better.
Alex says:
Sorry for the delay in approving the comment!
I also tried the Celestron one and truthfully it wasn’t better than the Antares.
The main issue is multiple reflections, and any glass can facilitate that process. The most helpful thing would be minimally-reflective glass, multiple internal optical elements, and/or a lowly-reflective optical *sensor*, as the DSLR sensor can send a lot of light back at it…
Alex says:
I’ve now discovered that most, although not all, of my ringing problems (particularly the colored ones!) were caused by the Nikon DSLR and not the reducer! The reducer displayed them more because of vignetting and the resulting faster (“brighter”) optics, in a complicated way that I outline in detail here.
I would be surprised if Canon didn’t do similar things to the RAW data causing this, including but not limited to lossy compression in the RAW files and other lens-intended color corrections. Something to potentially reevaluate…